Monday, November 23, 2009

Tutu Cute


I've been busy making some Christmas presents - tied tutus. They are so easy to make and so effective.

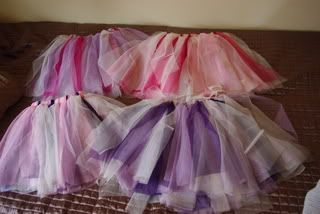
Here is a quick how to for one to fit up to approx 5 years old:

*You will need at least 2.5 metres total of soft 150cm wide tulle in the colours of your choice. The more tulle you use, the boofier it will be and fit a bigger waist.
*You will also need a piece of elastic to fit the waist of the wearer ( I cut mine approx 48cm) and sew the ends together by overlapping them.
*Alternatively you can simply use a piece of ribbon long enough to go around the waist and
enough to tie into a lovely bow.
*I then fold it in half lengthwise and run my scissors down the fold to give two strips.
*Pop them one on top of each other and cut them into 10cm wide strips. If you can find something to use as a guide it is a big help. My pine floorboards happen to be the right width so I line up the cut edge on one side of of a floorboard and use the line of the other side I can see
through the tulle as my cutting line.
*Now with all your strips cut, its time to start tying. Its a simple knot but the challenge is trying to get the ends to stay level if thats the look you want.
Some tutorials say to stack a few layers together and tie them together. This would create a nice full skirt but it would take a lot more tulle as you still need to cover the whole band in knots.
*Now here is how to tie

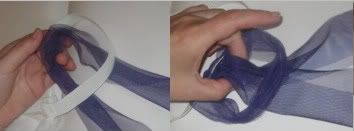
*I do mine in a regular pattern but thats my anality coming through until the whole band is covered. I find it takes about 50 strips at least.
*You could finish it off by trimming the ends if you like and with a flower or bow stitched to the front
*I have seen them done very short and very boofy which looks lovelt and is the more traditional dancing tutu. Using a stiffer tulle would make this type stick out more.

Now please let me know if this inspires you!

Saturday, September 12, 2009

For Lee

I spied this over at a new blog I've come across, Just Something I've Made, and immediately thought of Lee from Glimpse of Style.

Image via JSIM

Now Lee, I don't really think of you as a crafting type of a person but with your recent interest in knitting, you never know what might inspire you.


Wednesday, August 12, 2009

Kitchen Idea love.

The new movie Julie and Julia is all the talk at the moment. Apparently its a wonderful movie. What has been noted though is Julia Child's kitchen. After all our kitchens are a workspace so why should they not be organised like one, hence Julia's pegboard which her husband made for her.
Image via Smithsonian.com

Each pot and pan has its shadow outline drawn so it always goes back in the right place. Even the pegboard colour is lovely.

I have an aversion to stacking pots as I invariably want the one on the bottom so this is a perfect solution for me. Now to renovate a kitchen and figure out how to work it in...

Julia donated her kitchen to the National Institute of American History but her pegboard was at a different institution in California until being reunited recently which coincided with the release of the movie.


Wednesday, July 22, 2009

Playdoh recipe edit

I just wanted to let you know I've edited the playdoh recipe as I realised I'd missed an ingredient. This is the actual recipe:

Microwave Playdoh

1 cup plain flour
1/4 cup salt
2 tbsp Cream of Tartar
1 tbsp cooking oil
1 cup hot tap water
food colouring

Sift dry ingredients together
If you want to colour the whole batch add colourng to water
Add in liquids and stir well
Cook on high in microwave for 30 second increments, stirring between each.
Its ready when it forms a ball and is not sticky.
Let cool a little
Turn out and knead on surface for a minute to make a nice soft dough.
If the mix isn't coloured, you can knead in colour now.
Store in an airtight container in the fridge to prolong its life
Reheat on very low for 1 minute ot warm and soften if required

Thursday, July 16, 2009

Gift ideas #4


Oh how could I forget! My eldest will be getting his first bike! There are great ones with a push handle which controls the steering but unfortunately they are too small for my tall boy.


Gift ideas - found!

I've found one of my gift idea's! Soccer nets and at a nice price too. Available from Sam's Warehouse. I'm off to get a set today to put away for gift time.

Friday, July 10, 2009

Gift Ideas #3

A quick idea for Christmas for the rellies kids. Seeing as I have to post them over, I could make a batch of playdoh as I have a lovely and smooth recipe, colour it up a few different ways and parcel it up with some tools and the recipe.

Incase you are interested, my great recipe is from one of my friends.
1 cup plain flour
1 /4 cup salt
2 tbsp Cream of Tartar
1 tbsp cooking oil
1 cup hot tap water
food colouring

Sift dry ingredients together
If you want to colour the whole batch add colourng to water
Add in liquids and stir well
Cook on high in microwave for 30 second increments, stirring between each.
Its ready when it forms a ball and is not sticky.
Let cool a little
Turn out and knead on surface for a minute to make a nice soft dough.
If the mix isn't coloured, you can knead in colour now.
Store in an airtight container in the fridge to prolong its life
Reheat on very low for 1 minute ot warm and soften if required